How to Count Logs and Timber From a Photo for Yard and Truck Checks
Photograph log ends so a count is reliable, review every marker, and learn what a photo count cannot tell you about volume, weight or hidden logs.
Written by the Pixoate team. We check how each tool behaves before we describe it, and we date any prices or portal rules we quote.
Counting a log pile by hand means walking around it, losing your place, and starting again when a truck pulls in. Yet the number matters: it sits on a delivery note, a yard inventory or a haulage check, and a disagreement over a few dozen logs is awkward to settle without evidence.
A photo of the cut ends gives you something you can count carefully and keep. This guide explains how to photograph a pile or truck load, how to review the count, and what a photo count cannot tell you.
The quick answer
- Photograph the cut ends of the pile or load straight-on, filling the frame.
- Use even light and avoid shooting into low sun.
- Upload the photo and run the count.
- Review every marker, especially small logs, shadows and overlapping ends.
- Save the reviewed count with a label for the pile, truck or date.
- Treat volume, weight and grade as separate measurements.
What a photo count can do
A photo count marks each visible log end and gives you a tally. It suits:
- Timber truck-load drafts before a physical check.
- Sawmill and yard inventories.
- Forestry harvest tallies.
- Firewood stock counts. The same method works for cartons and pallets and for animals in a pen.
What it cannot do
It counts log ends it can see. Logs hidden behind others, logs on the far side of a pile and logs outside the frame are not counted. It counts only: it does not measure volume, diameter, species, grade or weight, so do not use it as a substitute for scaling or a weighbridge ticket.
Mixed piles are harder. If logs vary a lot in diameter, or if the pile contains different products, separate them where you can and count each group on its own.
How to photograph a log pile or truck load
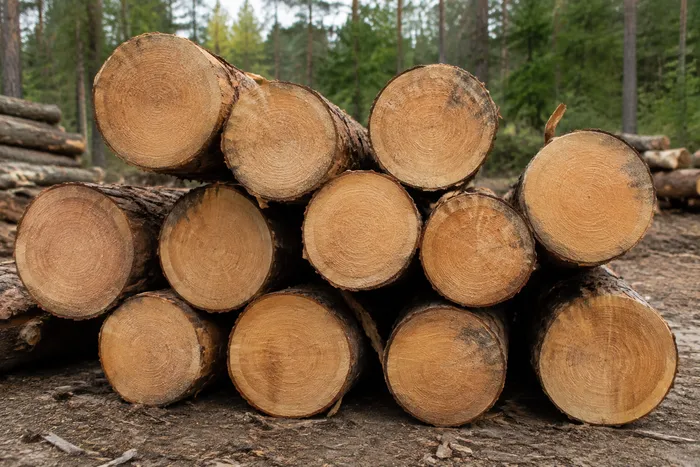
- Face the cut ends. Stand square to the end face so each end shows as a round shape, not a long side view.
- Fill the frame. Get close enough that the ends are large, but keep the whole face of the pile in view.
- Keep the camera level. A level camera keeps rows looking like rows.
- Use even light. Overcast light is ideal. Low sun throws deep shadows between logs that can look like extra ends.
- Split large piles. Photograph a long pile in sections and note where each section starts, so no end is counted twice.
- Clear the foreground. Move straps, tools and people out of the way, so they are not mistaken for logs.
Count with Pixoate
Open the Log Counter and upload the photo. Each detected log end is marked on the picture, so you can see exactly what was included. If you also handle other stock, the general object counter works for items that do not have their own page.
Review the markers
This step is what makes the number usable:
- Zoom into dense areas and look for ends without a marker.
- Look for two markers on one log, especially on split or cracked ends.
- Check that no marker sits on a shadow, a gap, a strap or a knot.
- Look at the edges of the pile, where logs are often cut off by the frame.
- Correct the tally to match what you can verify.
If the picture does not support a reliable count, retake it from a better position, or count that section by hand.
Reading a log pile like a scaler
A good log photo has a rhythm: round ends of different sizes packed together, with dark gaps between them. Those gaps are where most mistakes happen. A deep shadow between three logs can look like a small log end, and a split or cracked end can look like two. Bark flaps, strapping and a patch of snow or mud can also confuse a count.
When you review the result, work from one corner across the pile in rows, instead of looking at the whole image at once. Look for logs that are noticeably smaller than their neighbors, since small ends tucked into gaps are the ones most likely to be missed. Then look for markers sitting in the dark gaps. This slow pass takes a couple of minutes and catches the errors that matter.
If a pile is stacked several rows deep, remember that you are only looking at one face. Treat the count as the visible ends, and write down separately if you know the pile continues behind it.
Handle hidden logs honestly
Suppose the end face shows a clear tally, and you know the pile is stacked in a single layer along its length. You can describe the total as "visible ends counted, remainder not counted." Do not add an estimate for hidden logs to the reviewed number. Record the estimate in a separate line, labelled as an estimate, so a later reader can tell observation from assumption.
Different piles, different photographs
Logs are stored and moved in several ways, and each needs a slightly different approach. A neat stack with the ends aligned on one face is the easiest case, because the round ends form a regular pattern. A loose heap is harder, since logs lie at different angles and many are seen from the side, so a count of visible ends will understate the total. A truck load is usually photographed from behind, which gives a good view of the ends but may hide the front rows.
Weather also matters. Wet logs look darker, snow can fill the gaps between ends and hide small logs, and low winter sun creates long shadows. Where you can, choose a time of day with even light, and avoid photographing while rain is running off the pile. If a heap is untidy, consider whether a count is the right tool at all, or whether you should stack it before counting.
Keep a record you can use
Label each count so someone else can understand it, for example "Yard B, pile 3, north face." Add the reviewed result to your tally and export it as a CSV file or PDF report when you need it elsewhere. If you are signed in, a setup in Count history can keep counts for a pile or yard over time. It shows the last count recorded each day, and a missing day is not a zero.
A short example from a yard
Say a haulier delivers a load and the delivery note says 120 logs. You photograph the cut-end face from the back of the truck, in even light, and review the count. The reviewed count is 117. Three logs may be hidden behind the headboard, or the note may be wrong, or the count may have missed three. None of those can be settled from the photo.
What you do have is a clear starting point. You can look at the picture, find the area where the logs seem to be missing, and decide whether it is worth a physical check. If the same gap appears across several deliveries from the same supplier, you have evidence worth raising. If it appears once, you have a reason to take a closer look and nothing more. That is the realistic value of a photo count: not a verdict, but a fast, documented first check.
Putting the count in the right context
A log count answers one question: how many log ends are visible. Almost every decision about timber also depends on size, species, quality and weight, which are separate measurements. A pile of one hundred small logs is very different from a pile of one hundred large ones, and a count alone will not tell you which you have.
Think of the photo count as the first of several checks. It quickly gives you a number to compare with a delivery note or a previous inventory, and it leaves a picture of what the pile looked like. Your usual scaling, measuring or weighing then provides the figures that determine value. Treating the two as complementary keeps the count honest and keeps you from reading more into it than it can tell you.
Related guides
The same principles apply to other stock counted by sight. Read how to count inventory from a photo for the general workflow and how to count boxes and pallets from warehouse photos if you also move packed goods. For the wider picture, see our overview of counting from photos.
Frequently asked questions
How do I photograph a log pile for counting?
Shoot the cut ends straight-on in even light and fill the frame with the visible pile face. Upload the photo and review every marker before using the tally.
Can it handle different log diameters in one pile?
Mixed sizes are harder than a uniform pile. For tallies by diameter or species, separate the logs into groups where you can and count each group on its own.
Does it measure the volume of the timber?
No. It counts log ends. Use your normal scaling or measuring method for volume, weight and grade.
Can I use the count on a delivery note?
Use it as a reviewed estimate and confirm exceptions physically before it appears on a document. Keep the marked photo with the count so you can show what was included.
A log count is a fast first check that leaves a picture behind, and your normal scaling still decides value. The Log Counter is built for exactly that first check.