How to Make Property Listing Photos Look Professional Without a Photographer
Prepare, shoot level and bright, and make fair edits for light, clutter and sky without misleading buyers.
Written by the Pixoate team. We check how each tool behaves before we describe it, and we date any prices or portal rules we quote.
Listing photos are the first showing. Before anyone books a viewing, they scroll through your pictures and decide whether the property deserves their time. Dark rooms, tilted walls, clutter and a flat grey sky make a good home look tired, while bright, straight, tidy photos make the same home look cared for.
You do not need to hire a photographer for every listing. This guide covers the shooting habits that matter most, the edits worth making, and the line between presentation and misrepresentation.
The five-step version
- Prepare the property: clean, declutter, repair, light.
- Shoot in daylight with every light on, level and from a corner.
- Pick a consistent order that follows a viewing.
- Fix light, clutter and flat skies with careful edits.
- Disclose digital changes and keep the originals.
Prepare before you shoot
Editing cannot replace preparation. Before the camera comes out:
- Clean windows, floors, worktops, mirrors and bathrooms.
- Put away personal items, cables, bins and cleaning products.
- Make beds, straighten cushions and clear surfaces.
- Replace dead bulbs and open every blind.
- Tidy the front, including the entrance, bins and garden.
Shooting habits that make a difference
- Time. Shoot when the room is brightest, avoiding hard direct sun on the walls.
- Lights. Turn on every lamp and ceiling light, so rooms look warm instead of flat.
- Height. Stand in a corner with the camera about chest height.
- Level. Keep the camera level, so walls and door frames stay vertical.
- Width. Use a wide view for space, but avoid extreme settings that distort rooms.
- Details. Add close shots of features buyers care about, such as a fireplace, storage or a view.
- Exterior. Take the front elevation in good light, and a garden shot if it is attractive.
Photographing the exterior
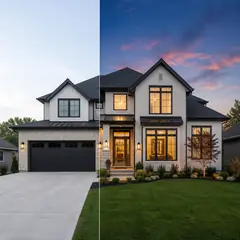
The front of the property is usually the first image buyers see, so give it proper attention. Choose a time when the light falls on the front of the house, which is often morning or late afternoon depending on which way it faces. Overcast days give soft, even light but a flat sky, while bright sun creates strong contrast and sharp shadows. If the sky looks dull, a clearly disclosed edit is better than a misleading one.
Prepare the scene before you shoot. Move cars off the drive and the road in front, put bins away, sweep the path, mow the lawn and trim hedges. Take the photo from a spot that shows the whole house without cutting off the roof, with the camera level so vertical lines stay straight. Add a second view from another angle and a photo of the garden or any outdoor space. A confident, tidy exterior tells buyers the rest of the property has been looked after.
Choose an order that follows the viewing
Buyers read a listing like a walk through the property:
- The front of the home.
- The main living space.
- The kitchen.
- The main bedroom and bathroom.
- Other bedrooms and spaces.
- Garden, parking and surroundings.
Put the strongest image first, because it becomes the thumbnail.
Edits worth making
Use edits to present the real property at its best, and nothing more.
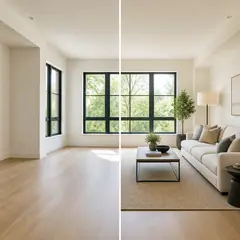
- Dark or flat rooms. The real estate photo editor is meant to improve light and presentation without changing the property itself, so always compare the result with the original. Keep brightness realistic.
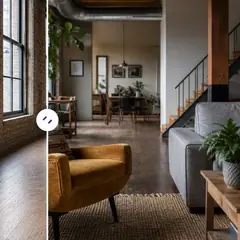
- Clutter. Declutter Room AI removes loose items from floors, furniture and surfaces. Use it for temporary clutter, not for permanent features or defects.
- Dull exteriors. Day to Dusk turns a daylight exterior into a dusk concept. Disclose it, because buyers will see a different mood when they arrive.
- Empty rooms. Virtual Staging AI creates furnished concepts so buyers can judge scale and use.
- Soft or small images. Use the Photo Enhancer for slight softness. Sharpening helps with mild softness, not with a photo that missed focus.
Thinking like a buyer who has seen five listings
Buyers rarely view one property in isolation. They compare it to the last five they scrolled through, and tiny differences in presentation decide which one gets the viewing. A bright, level, tidy gallery makes your property look cared for, and a dark, tilted one makes it look neglected even when it is the better home.
That comparison also explains why honesty matters. A buyer who arrives and finds the property smaller or darker than the photos suggested does not give the benefit of the doubt. They remember the disappointment, and it colors how they see everything else. A photo that looks slightly modest but matches reality produces a pleasant surprise instead. The goal is not the most dramatic gallery. It is the gallery that makes the right buyers book a viewing and then feel the property matches what they saw.
Where presentation becomes misrepresentation
Buyers rely on photos. Stay on the right side of the line:
- Do not remove permanent features, damage, power lines, neighbors or anything fixed to the property.
- Do not change the size, view or ceiling height of a room.
- Do not stage or edit in a way that implies an inclusion, such as furniture or fittings that are not part of the sale.
- Label virtually staged and sky-replaced images, and keep the unedited originals.
- Check the rules of your listing service and brokerage, because they differ.
Check the result like a buyer
Look at the final image on a phone, where most buyers see it. Ask whether the room looks the way it will in person. Compare windows, doors, ceilings and floor against the original, and make sure nothing important has changed.
A one-hour routine before you press the shutter
If you only have an hour, spend it in this order. First twenty minutes: walk the property with a bin bag and remove anything that does not belong, then wipe the surfaces and open every blind. Next ten minutes: turn on every light, check bulbs and close doors you do not want in shot. Then twenty minutes shooting, starting with the exterior while the light is good, then the main rooms, then smaller spaces. Use the last ten minutes to look through everything on your phone, zoom into corners and reshoot anything that is tilted, dark or has something odd in the background.
It is much quicker to fix a problem in the room than in an editor. A lamp moved six inches or a bin carried out of shot saves the editing time you would otherwise spend later.
Briefing and reviewing a photographer
If you hire a photographer, a short brief improves the result. Tell them what you want to emphasize, which rooms matter most and whether you want twilight or garden shots. Share any features that are not obvious, such as a view from an upper window. Make sure the property is ready and that someone is available to open doors and turn on lights.
When the photos arrive, review them as a buyer would. Look at them on a phone and on a larger screen. Check that verticals are straight, rooms are bright without looking unnatural, and nothing distracting has crept into the background. Ask for corrections if needed, and check that the set tells a clear story of the property from the front door to the garden. A good photographer will welcome the feedback, because it helps them deliver what you actually need.
Related guides
If your property is empty, read how to sell an empty house without buying furniture. To compare options for furnished presentation, see virtual staging vs traditional home staging.
Frequently asked questions
Do I need a professional photographer?
Not always. Careful preparation, good light and a level phone camera can produce clear listing photos. Many sellers choose a photographer for high-value homes.
Is it acceptable to edit listing photos?
Light improvements are common. Edits that change what the property is, or hide defects, are not acceptable. Disclose digital staging and sky changes.
Why do my photos look tilted?
Usually the camera is angled up or down. Keep it level, stand further back and let the lens capture the room in one frame.
How many photos should a listing have?
Enough to show every main space and feature. Check the requirements of your listing service for limits.
Preparation and a level camera do most of the work; editing should only finish the job. For a room that still looks dull, try the real estate photo editor and compare the result carefully with the real room.